This is the user manual that comes with the Harley Davidson Pager Receiver 2. This manual is for the pager that requires batteries. It does not cover instructions for the rechargeable pager. Although, I think both pagers probably have the same features and operate the same, but not sure.
 - IntroductionHarley Davidson Security System Pager 2 with Range Confirmation Signal
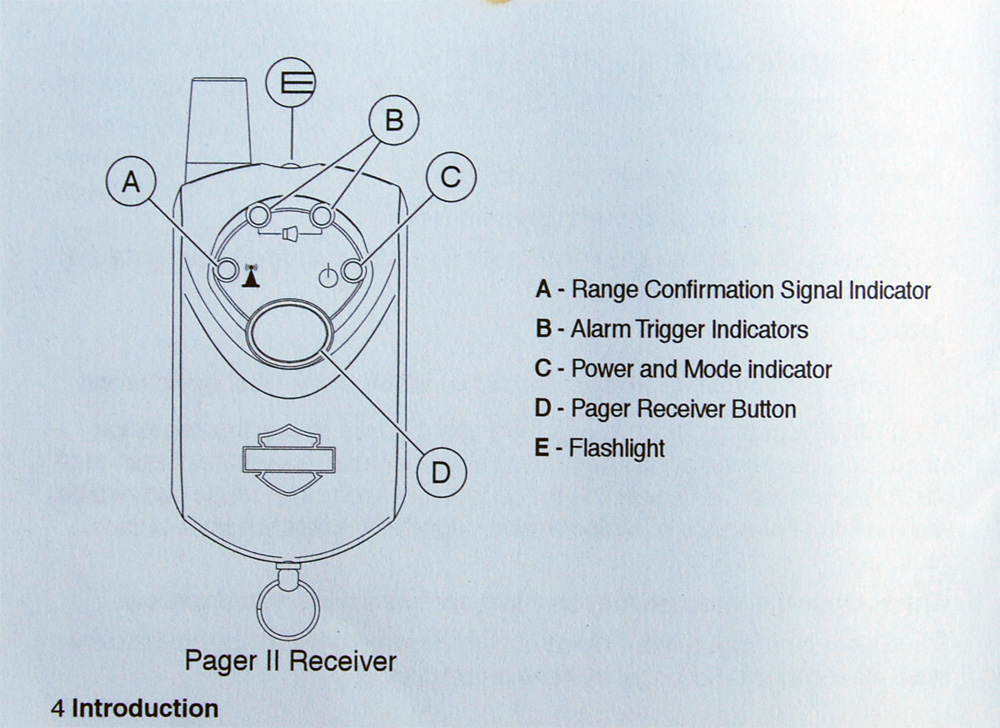
The Harley Davidson Security System Pager 2 with Range Confirmation Signal offers advanced FM Transmitted paging surveillance.
The pager monitors the Security System operation and using LED indicators displays unique codes for arming, disarming and trigger modes. The pager receiver is designed to operate in conjunction with, and requires the use of, the Security System Key Fob and Security System Smart Siren 2.
The Range Confirmation Signal (RCS) feature allows you to check and confirm that you are within range to receive a vehicle security condition signal when detected while the security system is armed.
The security systems high efficiency FM transmitter has exceptional range and a built in back up power supply. The transmitter will continue to operate even if the wires are cut or the vehicle battery is disconnected.
The pager receiver incorporates multi color LED indications which display arming modes and trigger signals with selectable vibration or audible alert modes.
The pager receiver requires on CR2450 3V lithium battery (available at a Harley Davidson dealer, Part number 66378-06). The receiver holster includes an attachment clip that accepts belts up to 1-3/4 inches wide.
Do not ride with the pager receiver attached to keys inserted in the ignition. The pager receiver is not water proof and may be damaged in wet riding conditions.
FCC RegulationsThe device complies with Part 15 of the FCC Rules and with RSS-210 of Industry Canada Rules.
Operation is subject to the following conditions:
- This device may not cause harmful interference.
- This device must accept any interference received, including interference that may cause undesired operation
RangeNote: Environmental and geographic conditions may affec signal range.The average reception range is approximately 1/2 mile. The actual reception range could be greater or less depending on the location and/or the presence of obstacles between the vehicle and the receiver. The reception range can also be affected by the presence of strong electromagnetic interference from outside sources
When indoors the reception may be improved by standing near a window.
The system is equipped with a range confirmation feature that notifies the owner when the receiver is no longer in the reception range.
 - SetupEncoding the Pager Receiver
The following procedure must be followed in order to encode a new pager receiver, or re-encode a pager receiver for a different motorcycle.
2006 and Earlier Models (Button FOB)- Ensure pager receiver is turned OFF
- Press and hold the pager receiver button (D). The pager receiver will flash and vibrate to indicate it is in the ON mode. Continue to hold the button until the LED indicators begin to flash one after another and the receiver begins to beep once every two seconds. The pager receiver is now in the encodeing mode.
Note: The encoding mode will time out after beeping five times. If it times out repeat Steps 1 and 2.
- Press the Security System Key Fob once to arm the security system. The pager receiver will indicate that it has been successfully encoded by beeping four times.
- To verify that the pager receiver has been successfully encoded disarm the security system by pressing the Security System Key FOB button twice. Press the Security System Key FOB button once to arm the security system. The left LED indicator (A) will begin to flash to indicate that it is receiving the Range Confirmation Signal (RCS). It may take up to 60 seconds for the indicator to begin flashing.
2007 and Later Models (Hands Free FOB):- Ensure that the motorcycle ignition switch is turned to the OFF position.
- Ensure pager receiver is turned OFF.
- Press and hold the pager receiver button (D). The pager receiver will flash and vibrate to indicate it is in the ON mode. Continue to hold the button until the LED indicators begin to flash one after another and the receiver begins to beep once every two seconds. The pager receiver is now in the encoding mode.
Note: The encoding mode will time out after beeping five times. If it times out repeat Steps 2 and 3.
- Quickly turn the motorcycle ignition switch to the ON position, then back to the OFF position. Within several seconds, the pager receiver will indicate that it has been successfully encoded by beeping four times.
- To verify that the pager receiver has been successfully encoded, disarm the security system by turning the motorcycle ignition switch to the ON position. Then quickly turn the ignition switch back to the OFF position to arm the security system. This left LED indicator (A) will begin to flash to indicate that it is receiving the Range Confirmation Signal (RCS). It may take up to 60 seconds for the indicator to begin flashing.
Multiple Pager ReceiversMultiple pager receivers can be encoded to the same security system. Follow the
Encoding the Pager Receiver procedure above for each of the pagers simultaneously in order to encode them to a single security system.
Supporting Multiple MotorcyclesThe pager receiver can only be encoded to receive transmissions from one security system at a time. The pager receiver can be re-encoded to work with different Harley Davidson motorcycles equipped with the Security System Smart Siren 2 by following the
Encoding the Pager Receiver procedure above.
Range Confirmation Signal (RCS)After the system is armed, the pager receiver will automatically monitor signal reception and will instantly display range status when the system is armed.
Back-Up SignalWhen armed, if the security system is disconnected or the power interupted, it will transmit a full alarm trigger, which the pager receiver will receive and indicate, if within range.
- OperationTurn the Receiver ONPress and hold the button (D) on the receiver for approximately two seconds (see Pager Receiver 2 illustration photo above). All of the LED indicators will flash and the receiver will beep twice and vibrate to indicate that the receiver has been turned ON. The right LED indicator (C) will continue to flash green to indicate that the receiver is ON and in the audible alert mode.
Arming2006 and Earlier Models (Button FOB):With the pager receiver turned ON, press the security system key FOB once near the motorcycle and arm the security system. The left LED indicator (A) will begin to flash to indicate that it is receiving the Range Confirmation Signal (RCS).
If the security system has been armed before the pager receiver has been turned ON, it may take up to 60 seconds for the left LED indicator to begin flashing.
2007 and Later Models (Hands Free FOB):With the pager receiver turned ON, quickly turn the motorcycle ignition switch to ON, then back to OFF. The left LED indicator (A) will begin to flash to indicate that it is receiving the Range Confirmation Signal (RCS).
If the security system has been armed before the receiver has been turned ON, it may take up to 60 seconds for the left LED indicator to begin flashing.
All Models:In order to protect the power supply the security system will only broadcast the RCS for one hour. The security system will remain armed, and will alert the pager receiver in the event of a trigger if within range.
Disarming2006 and Earlier Models (Button FOB)Press the key FOB button twice to disarm the security system. The receiver will beep once, and the left LED indicator will stop flashing.
2007 and Later Models (Hands Free FOB):Turn the motorcycle ignition switch to the ON position. The receiver will beep once, and the left LED indicator will stop flashing.
Turning the Receiver OFFWile turned ON, press and hold the button for approximately 3 seconds. The receiver will sound a long beep and vibrate, the right LED idicator will flash red, then all of the LED indicators will turn OFF.
FlashlightPress and hold the button on the back of the pager receiver as disired to operate the ultra bright LED flashlight (E) on top of the pager receiver.
- Alert Modes and DisplaysAudible Silent ModeWhile the receiver is ON, press the button (D) for one second (see pager receiver 2 illustration photo above). The pager receiver will vibrate once to indicate that it is in the silent/vibrate mode and right LED indicator (C) will flash red.
To toggle back to the audible mode, press the button for one second again. The pager receiver will beep once and the right LED indicator will flash green.
Short AlarmIn the event of a shock trigger or short alarm, the top two LED indicators (B) of the pager receiver will flash alternately and vibrate twice. If the audible alarm is activated it will also beep twice.
Full AlarmIn the event of a tilt, ignition or back-up signal trigger or full alarm, the top two LED indicators (B) will flash simultaneously and vibrate four times. If the audible alarm is activated it will also beep four times.
Trigger MemoryAfter an alarm trigger, the right LED (C) will flash twice. First it will flash red or green depending on whether the receiver is in audible or silent mode and then flash red to indicate that the security system has been triggered.
To erase the memory press the button momentarily. The trigger memory will only remember the most recent trigger.
Low Battery IndicationAs a reminder, if the receiver battery is low, the right LED indicator (C) will blink three times. If the battery is low, the receiver will no longer display the audible/silent mode indicator or memory features
To conserve battery life, it is recommended that the pager receiver be turned off when the system is disarmed. When in use, the pager receiver battery life is approximately 45 to 50 days.
- TroubleshootingFor reliability, the Harley Davidson Security System 2 Pager Receiver uses sealed electronic components that are not user serviceable. In the event that the system requires service, the user can check basic system function and replace the batteries in the fob(s) and security system pager receiver.
However, if further troubleshooting is necessary, contact your Harley Davidson Dealer. Your dealer is equipped with special training and tools to perform detailed diagnostic testing on this equipment.

